一种通过DAP协议实现代码运行可视化的方案
最近看到了一个代码可视化的工具pythontutor,可以让代码按步展示详细过程。感觉有点意思,决定尝试实现一下。
在研究过程中发现,借助本地调试器提前拆分出代码的步骤执行顺序是一个不错的方案,因此又先转向如何通过程序控制调试器,中间了解到诸如DAP、CDP协议等不少知识,决定记录一下。
本文涉及到的完整代码已经放在了github上面:custom-debugger-with-dap。
参考
Debug调试
代码调试是每个程序员都绕不开的工作,先来看看编程语言的debug功能是如何实现的。
原理
CPU、操作系统在设计的时候就支持debugger的能力,这个能力是基于“中断”。
中断是计算机体系结构中用于处理异步事件的一种机制,包括硬中断(Hardware Interrupt))或软中断(Software Interrupt)。
当中断发生时,当前正在执行的程序会被暂停,系统会切换到处理中断的程序(中断服务例程)执行。一般来说,中断处理完成后,系统会尝试恢复到中断发生前的状态,以继续执行被中断的程序。
CPU支持INT指令来触发中断,根据约定,其中INT3 (3号中断)可以触发中断。
可执行文件在运行时,如果遇到断点,就会将对应位置的指令内容替换成INT3,这样就会触发程序中断,然后再获取这时候的环境数据来进行程序调试;调试完毕后,再将断点处的指令内容恢复原样就可以了。
最底层的断点原理就是这个基础的INT3指令替换,而在实际开发中,断点调试有多个比较常用的功能,以Chrome调试JS断点为例
- F8:
Resume跳过当前断点,如果程序后面还有断点则进入到下一个断点的位置;如果程序后面没有断点则直接退出断点调试 - F9:
Step按照步骤执行每一行代码 - F10:
Step Over按步骤执行,如果当前步骤包含函数调用,整个函数将被执行完毕而不进入其内部 - F11:
Step into按步骤执行,如果当前步骤包含函数调用,则进入该函数的内部,逐行执行其中的代码,- 与F9的区别在于碰见定时器
setTimeout等异步代码时,F9会按照程序执行顺序进入下一行同步代码。
- 与F9的区别在于碰见定时器
大部分语言的编译器都附带了调试器的功能,
- 调试器在单步调试的时候,调试器会在下一个执行的语句位置设置一个临时断点,这样就可以实现
Step Over和Step into等效果。 - 调试器可以获取当前运行环境的变量,提供访问和修改等功能
借助调试器开放的功能,开发者就可以交互式地进行调试操作,如设置断点、执行程序、查看变量值等。
Node.js调试
Node.js内置了node inspector调试器,要调试Node.js代码,可以通过--inspect参数,启动程序之后会看见如下的信息
node --inspect test.js
Debugger listening on ws://127.0.0.1:9229/xxx
For help see https://nodejs.org/en/docs/inspector
使用Chrome打开地址:chrome://inspect,然后可以查看对应的inspect,这样就可以通过chrome调试本地的node代码了。
需要注意的是,通过Chrome调试Node.js代码,和直接调试浏览器里面的JavaScript有很大区别,由于两者的js 运行时不一样,在Chrome中并不能直接执行Node.js代码,那么是如何实现这个调试功能呢?
分析一下具体实现
- Node.js 实际上是一个基于V8 引擎的应用程序,V8引擎有一套
V8 Debugging Protocol,用来调试js代码 - Chrome浏览器内置了一套可以用于远程调试的接口,称为
Chrome Remote Debugging Protocol,可以通过接入这套接口使用Chrome Devtool的UI -- inspect参数实际上是通过 node inspector启动了一个调试服务,这个程序- 接入了
V8 Debugging Protocol,因此可以向V8引擎发送调试指令 - 接入了
Chrome Remote Debugging Protocol,因此在Chrome Devtool通过可视化的调试界面点击某个按钮时,该程序可以接受消息
- 接入了
在这个过程中,Chrome Devtool 的source面板是调试客户端,通过CDP协议发送调试命令到node inspector,再转发到V8引擎进行真正调试,相关的响应也原路返回给Chrome。
可以看出node inspector本质上是一个代理,只是用来转发Chrome Devtool和V8引擎的调试消息。(果然,计算机科学领域的任何问题都可以通过增加一个间接的中间层来解决
了解了node inspector功能的实现原理,如果想要自定义一套Node.js 的调试客户端,应该就有头绪了
- 了解
V8 Debugging Protocol暴露出来客户端接口,比如要进行下一步、跳到下一个断点对应的命令名称 - 构建调试界面UI,在合适的时机调用对应接口
如果想要自定义其他编程语言的调试客户端,就需要了解一点更多的东西:DAP协议。
DAP协议
什么是DAP
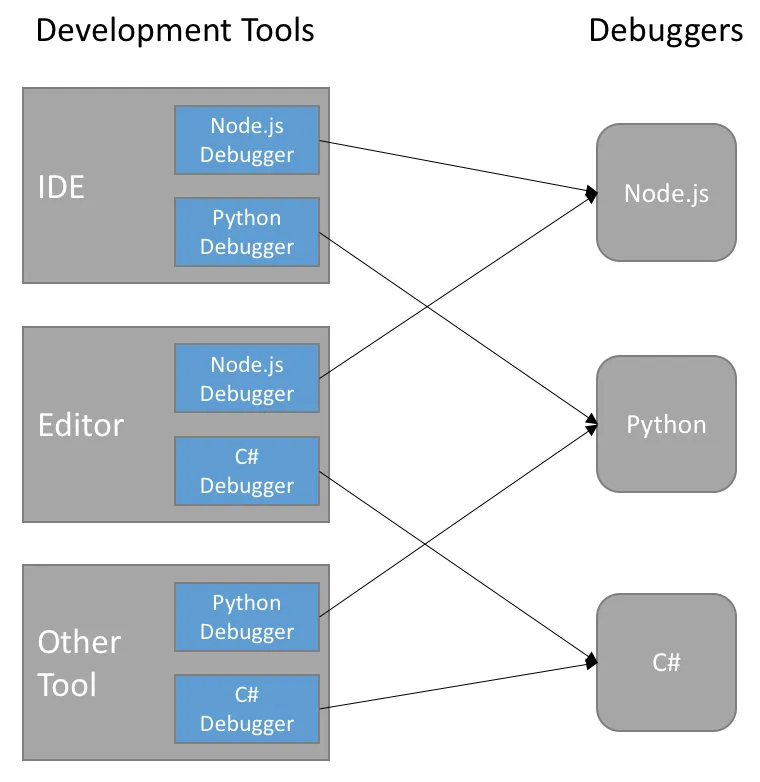
JavaScript的V8引擎提供了V8 Debugging Protocol,其他编程语言可能也有类似的调试协议。由于历史原因,不同编程语言的调试协议虽然功能类似,但指令和参数可能不太相同。
社区有不少比较流行的代码编辑器执行代码调试,如sublime、atom、vscode、webstrom等,每个编辑器的每种语言,都需要接入对应语言的debug协议,然后开发自己的调试UI界面。
假设现在我们要编写一个新的代码编辑器,这个编辑器要支持多种语言的调试,就需要按语言挨个适配,这个工作量还是比较大的。

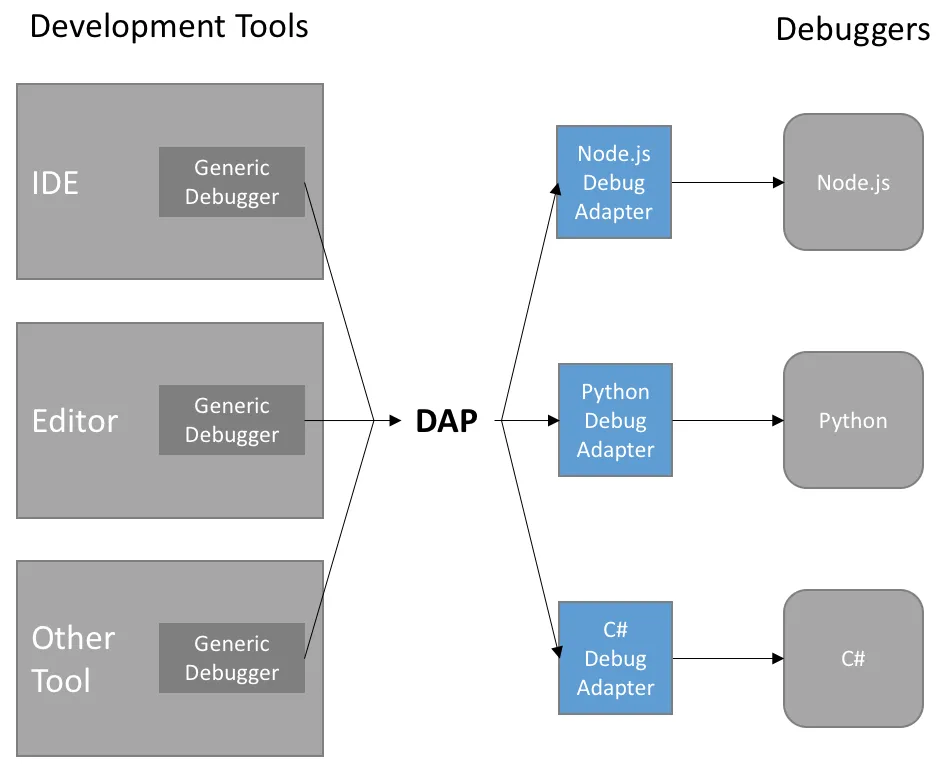
因此微软提出了一套Debug Adaptor Protocol(不知道是不是在开发vscode的时候提出的):
- 由社区按每种语言实现一套符合DAP协议的debug adapter,这个adapter可以与语言内置的调试器通讯,并且暴露出了统一的调试接口
- 如果代码编辑器作者,想要自定义一套调试界面,只需要按照DAP协议对接一次就可以了

社区提供了大部分语言的DAP实现,这些实现都遵循DAP协议。
因此,只需要编写一些简单的代码,就可以构建出一个能够发送调试指令和接收响应的程序。(当然,如果某个语言还没有对应的DAP实现,可以尝试根据DAP协议实现一个,贡献给社区。)
在这一章节,我们将演示一个开发python调试功能的程序,用于体会DAP协议到底节省了哪些工作量。
pdb
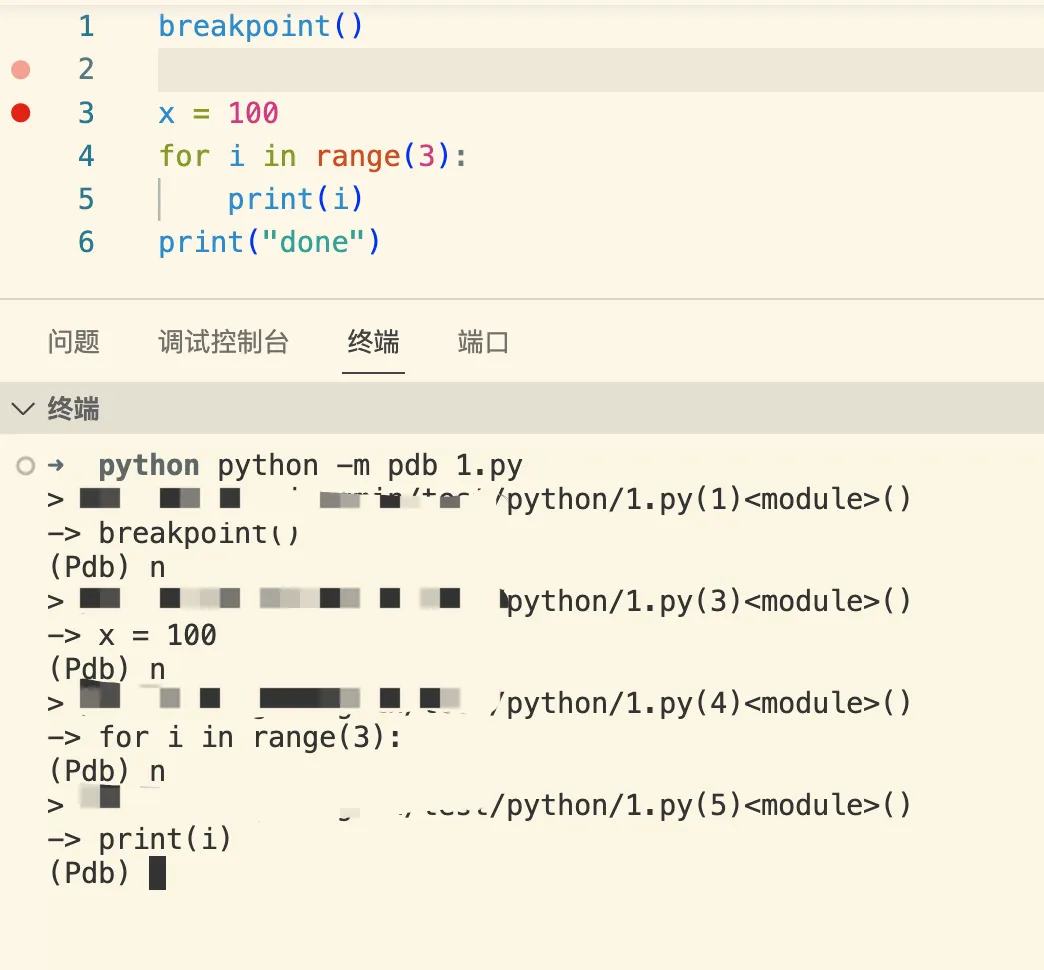
pdb是python内置的的交互式源码调试器,与node inspector比较相似,先来看看python自己的调试器
编写如下代码
// 1.py
breakpoint() # 打个断点,类似与js的debugger
x = 100
for i in range(3):
    print(i)
print("done")
然后运行pdb
python -m pdb 1.py就进入了交互式的调试界面,可以输入一些pdb指令进行调试
- b 设置断点
- c 继续执行
- n 单步执行
- p 打印变量
- q 退出调试

与前面的Node.js代码调试过程比较,可以看出不同语言默认的调试交互差异还是挺大的。
debugpy
debugpy 是一个由微软提供的Python调试器,它设计用于与 Visual Studio Code 等现代 IDE 集成,可以使用 VS Code 中的调试界面来调试python代码。
debugpy实现了DAP协议,我们先看看如何通过VSCode调试python代码,再研究如何通过DAP协议调用接口调试
首先安装debugpy
pip install debugpy在项目的.vsocode目录下创建launch.json配置文件
{
    // Use IntelliSense to learn about possible attributes.
    // Hover to view descriptions of existing attributes.
    // For more information, visit: https://go.microsoft.com/fwlink/?linkid=830387
    "version": "0.2.0",
    "configurations": [
        {
            "name": "Python: Attach",
            "type": "python",
            "request": "attach",
            "connect": {
              "host": "localhost",
              "port": 5678
            }
          }
    ]
}然后以debugpy模块的形式执行我们的python代码,这个代码会启动一个端口号为5678的服务,等待调试客户端连接,这里的调试客户端就是VSCode。
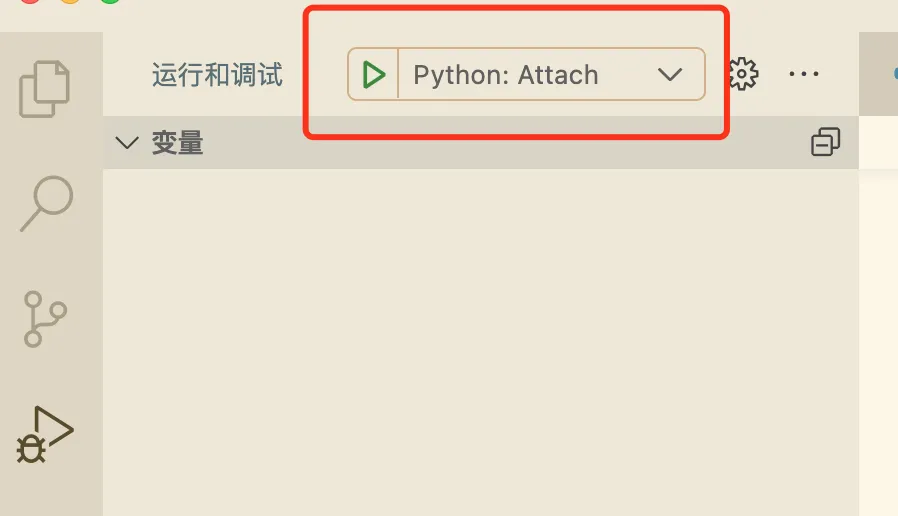
python -m debugpy --listen 5678 --log-to ./log --wait-for-client 1.py切换到调试面板,可以看到这里的调试名称,点击运行按钮,就可以愉快地进行调试了。

debugpy遵循了DAP协议,我们也可以编写一个程序,连接5678这个端口的服务,然后通过网络消息进行调试,这样就可以自定义一个python调试界面。
// client.js
const net = require('net');

const client = new net.Socket();

function sendRequest(command, arguments) {
    const message = {
        type: 'request',
        command,
        arguments,
    };
  	// 下面这个格式的DAP规定的
    const json = JSON.stringify(message);
    client.write(`Content-Length: ${Buffer.byteLength(json, 'utf8')}\r\n\r\n${json}`, 'utf8');
}

function onResponse(data) {
    console.log(data.toString())
}

client.connect(5678, 'localhost', () => {
    // // 构造要发送的消息
    client.on("data", onResponse)

    sendRequest("initialize", {
        "clientID": "custom python debugger",
        "clientName": "custom python debugger",
        "adapterID": "python",
        "pathFormat": "path",
        "linesStartAt1": true,
        "columnsStartAt1": true,
    })
  	// 可以发送更多的命令,如设置断点、进入下一步等
  	// 注意某些命令有调用顺序的限制,具体可以参考DAP官方文档
    // 协议文档:https://microsoft.github.io/debug-adapter-protocol/specification
});当debugpy的调试服务启动后,我们就可以通过上面这种脚本的形式连接调试,通过发送命令的方式执行调试了。
debugadapter
从上面的过程可以看出,如果我们想自己开发一个新的代码编辑器,要支持python调试,只需要通过debugpy运行脚本启动调试服务,然后实现类似于上面的client.js就可以了,不用再去实现一个适配python pdb调试器命令相关的东西。
同样,要支持其他语言,只需在社区找到对应语言实现了DAP协议的调试器,稍微修改一下上面脚本的参数(比如端口号、一些类型啥的),就可以很容易地实现。
回到章节开头的问题,DAP节省的工作量就是开发一个新IDE时,不用再单独去重新适配一套各种语言的调试协议!
作为一个伟大的开源工具,VSCode将他的debugger客户端实现也开源了:vscode-debugadapter-node,这个仓库里面包含三个npm包
vscode-debugprotocol声明了DAP中各种事件、请求、响应的TS类型,对于开发自己的库也很有帮助vscode-debugadapter,通过Node.js代码实现的联通各个语言DAP调试器vscode-debugadapter-testsupport,用来测试 DAP 兼容调试适配器的支持库,模拟测试请求,方便编写测试用例
其中vscode-debugadapter-testsupport这个库里面的ProtocolClient.ts类,展示了解析DAP协议的详细过程,以及客户端如何接收和发送消息的实现,代码很短,但看完之后对整个DAP客户端的实现就比较清楚了。
这个类甚至可以直接作为一个接收和发送DAP消息的客户端,这样我们就不需要单独解析DAP协议了。
当然,最简单的还是直接使用vscode-debugadapter这个库,其中的DebugSession类实现了一个调试器客户端大部分功能接口,非常值得参考。
import { DebugSession } from '@vscode/debugadapter'
class CustomDebugSession extends DebugSession {
  // 父类忽略了event类型的响应,导致on监听无法生效,需要自己重写一下这个方法
  handleMessage(msg) {
    if (typeof msg.event !== 'undefined') {
      const event = msg
      this.emit(event.event, event)
    } else {
      super.handleMessage(msg)
    }
  }

  // 将发消息的sendRequest由回调修改为Promise
  send(command, args, timeout = 2 * 1000) {
    return new Promise((resolve, reject) => {
      this.sendRequest(command, args, timeout, (data) => {
        if (data && data.message === 'timeout') {
          reject(data)
        } else {
          resolve(data)
        }
      })
    })
  }
}
通过调试器获取代码执行步骤
了解了DAP,通过找到了@vscode/debugadapter这个现成的DAP客户端工具,我们就可以实现文章开头的那个问题:通过程序控制调试器获取一份代码按步骤执行的数据。
大概思路就是:
看起来这个思路还是可行的,只需要在DAP文档中找到相关的命令名称和参数即可。
由于前面演示了python代码的debugpy调试器,这里就演示一下javascript代码的一个实现的DAP协议的调试器:vscode-node-debug2。
(vscode-node-debug2这个仓库目前不维护了,所有功能都整合到vscode-node-debug中了,但我暂时没有找到vscode-node-debug脱离VSCode之外如何实现直接调试js代码的功能。)
vscode-node-debug2这个包没有发布到npm上,因此需要手动下载下来然后编译,这里使用git submoudle的方式下载到项目目录
git submodule add [email protected]:microsoft/vscode-node-debug2.git
cd vscode-node-debug2
npm i
npm run build运行之后,就可以通过运行输出文件node ./out/src/nodeDebug.js启动一个DAP服务,等待挂载js代码进行调试。下面简单展示一下脚本的编写。
首先通过child_process启动nodeDebug服务
import { fileURLToPath } from 'node:url'
import path, { dirname } from 'node:path'
import childProcess from 'node:child_process'

const __dirname = dirname(fileURLToPath(import.meta.url))

const debugLibFile = path.join(__dirname, '../../vscode-node-debug2/out/src/nodeDebug.js')
const child = childProcess.spawn('node', [debugLibFile], {
  cwd: __dirname,
})然后在CustomDebugSession类上实现一个自定义方法init,监听一些事件,以及通过steps成员变量保存数据
export default class CustomDebugSession extends DebugSession {
  // ...
  init(inStream, outStream) {
    this.start(inStream, outStream)
    this.on('stopped', async (event) => {
      // 每次停在debug的地方都会触发该事件
      this.threadId = event.body.threadId
    })

    this.on('terminated', (event) => {
      this.terminated = true
    })

    this.steps = []
    this.on('output', async (event) => {
      const { steps } = this
      const { category, output } = event.body
      if (!/std/.test(category)) return
      const step = steps[steps.length - 1]
      if (step) {
        step.output = output
      }
    })
  }
}
连接子进程的输入和输出,可以看出这里与debugpy的链接方式有些不同
const debugSession = new CustomDebugSession()
debugSession.init(child.stdout, child.stdin)
然后是发送一些初始化的基础消息
await debugSession.send('initialize', {
  adapterID: 'debug-demo',
  linesStartAt1: true,
  columnsStartAt1: true,
  supportsOutputEvent: true,
  pathFormat: 'path',
})

const debugFile = path.join(__dirname, '../../files/test.js') // 需要调试的源代码文件
await debugSession.send('launch', { program: debugFile })

// 等待一会再设置断点,不然貌似断点设置不会成功
await sleep(1000)

await debugSession.send('setBreakpoints', {
  source: { path: debugFile },
  breakpoints: [{ line: 1 }],
})
// console.log(data)

// 这里设置断点
await debugSession.send('configurationDone')
最后,循环发送next命令直到结束,将这个方法也写在类上面
export default class CustomDebugSession extends DebugSession {
  //...
	async autoRunStep(debugFile) {
    const debugSession = this

    if (!debugSession.threadId) {
      console.log('threadId is undefined')
      return []
    }
    // 调试文件直到结束
    while (true && !debugSession.terminated) {
      const step = {
        line: undefined,
        column: undefined,
        variables: [],
        output: '',
      }

      const {
        body: { stackFrames },
      } = await debugSession.send('stackTrace', { threadId: debugSession.threadId })
      const frame = stackFrames[0]
      // 只查看当前文件内的代码
      if (frame.source.path !== debugFile) {
        break
      }

      await sleep(200)

      step.column = frame.column
      step.line = frame.line

      const {
        body: { scopes },
      } = await debugSession.send('scopes', { frameId: frame.id })

      await sleep(200)

      const scope = scopes[0]
      const {
        body: { variables },
      } = await debugSession.send('variables', { variablesReference: scope.variablesReference })

      step.variables = variables.map((row) => {
        const { name, value, type } = row
        return {
          name,
          value,
          type,
        }
      })

      debugSession.steps.push(step)
      await sleep(200)
      console.log('parse by step...')
      // 下一步指令
      await debugSession.send('next', { threadId: debugSession.threadId })
      await sleep(200)
    }
    return debugSession.steps
  }
}
代码有点长,但逻辑比较简单
- 首先发送
stackTrace获取当前步骤所在的frame,以及当前停止的位置,包括column和line - 然后根据frameId发送
scopes获取作用域 - 最后根据scope的variablesReference发送
variables,将相应的变量也保存在steps变量中
调试结束后,返回debugSession.steps。
运行一下,以下面这段简单de
const x = 100
for (let i = 0; i < 3; ++i) {
  console.log(i)
}

console.log('done')
得到的结果为
[{"line":1,"column":1,"variables":[{"name":"this","value":"undefined","type":"undefined"},{"name":"x","value":"undefined","type":"undefined"}],"output":""},{"line":2,"column":11,"variables":[{"name":"this","value":"undefined","type":"undefined"},{"name":"x","value":"100","type":"number"}],"output":""},{"line":3,"column":14,"variables":[{"name":"this","value":"undefined","type":"undefined"},{"name":"i","value":"undefined","type":"undefined"}],"output":""},{"line":3,"column":19,"variables":[{"name":"this","value":"undefined","type":"undefined"},{"name":"i","value":"0","type":"number"}],"output":""},{"line":4,"column":3,"variables":[{"name":"this","value":"undefined","type":"undefined"},{"name":"i","value":"0","type":"number"}],"output":"0\n"},{"line":3,"column":26,"variables":[{"name":"this","value":"undefined","type":"undefined"},{"name":"i","value":"0","type":"number"}],"output":""},{"line":3,"column":19,"variables":[{"name":"this","value":"undefined","type":"undefined"},{"name":"i","value":"1","type":"number"}],"output":""},{"line":4,"column":3,"variables":[{"name":"this","value":"undefined","type":"undefined"},{"name":"i","value":"1","type":"number"}],"output":"1\n"},{"line":3,"column":26,"variables":[{"name":"this","value":"undefined","type":"undefined"},{"name":"i","value":"1","type":"number"}],"output":""},{"line":3,"column":19,"variables":[{"name":"this","value":"undefined","type":"undefined"},{"name":"i","value":"2","type":"number"}],"output":""},{"line":7,"column":1,"variables":[{"name":"this","value":"undefined","type":"undefined"},{"name":"x","value":"100","type":"number"}],"output":"done\n"},{"line":8,"column":1,"variables":[{"name":"Return value","value":"undefined","type":"undefined"},{"name":"this","value":"undefined","type":"undefined"},{"name":"x","value":"100","type":"number"}],"output":""}]可以看出,这份数据能够标记当前每一步代码在哪个地方暂停,以及这个地方相关变量和输出内容,拿到数据就可以在前端尝试实现一个steper来展示每一步的代码状态,这里就不再展开了。
完整代码已经放在了github上面:custom-debugger-with-dap。
小结
本文展示了一种实现代码按步骤执行的思路:借助DAP调试器,通过程序的方式,获取一段源码按步骤执行的数据,然后在UI上还原(这一步没有去实现了)。虽然不知道pythontutor具体的视线原理,但看起来上面这种思路应该是可行的。
通过这两天的研究,对代码debug调试器也有了进一步的了解,收获颇多。
再次感谢VSCode,感谢开源社区!
你要请我喝一杯奶茶?
版权声明:自由转载-非商用-保持署名和原文链接。
本站文章均为本人原创,参考文章我都会在文中进行声明,也请您转载时附上署名。
